Platform Software Setup
Procedure to Flash the Bootloader Firmware (QSPI)
Bootloader updates are typically not required, as firmware is usually updated during normal operation. However, the bootloader flashing procedure is described below.
| File Names | Details |
|---|---|
| DEF_XENO_R2L100_DDR4_2GB_1PCS.mot | Flash Writer image downloaded to RAM and used for flash programming. |
| XENO_R2L100_bl2_bp.srec | BL2 stage bootloader image programmed into QSPI flash. |
| XENO_R2L100_fip.srec | Combined TF-A and U-Boot image programmed into QSPI flash. |
Step-by-step procedure:
-
Download Required Software
- Download the latest Bootloader and Kernel image package from the Eoxys download portal.
- Extract all files into a working folder on the development PC.
-
Connect Hardware
- Type-C Cable (Debug UART)
- +12 V Power Adapter (≥ 2 A)
-
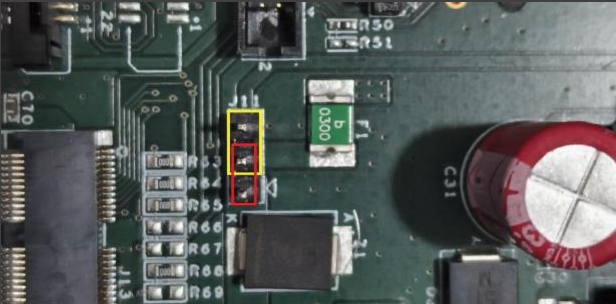
If a power adapter is not available, place a jumper across J11 pins 2 and 3 (refer to the highlighted yellow box in the figure). In this configuration, the board receives 5V power supply through the USB connection.
-
When using an external power adapter, place a jumper across J11 pins 1 and 2 (refer to the highlighted red box in the figure), then connect a +12V DC supply to the board
-
Serial Terminal Configuration
Configure the serial terminal application with the following parameters:- Baud Rate: 115200 bps
- Data Bits: 8bits
- Parity: None
- Stop Bits: 1bit
- Flow control: None
-
Enable SCIF Download Mode
Set the SW2 boot switch to the SCIF download configuration as shown in the figure below.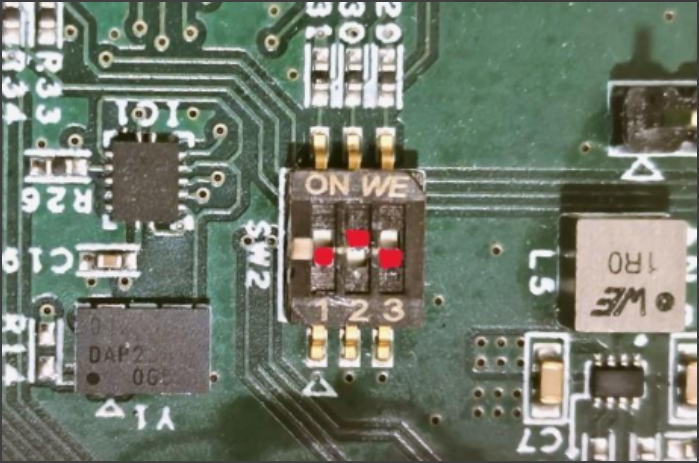
-
Enter Download Mode
After completing the above configuration, press the RESET button (S1). Status messages indicating SCIF download mode will appear on the serial terminal.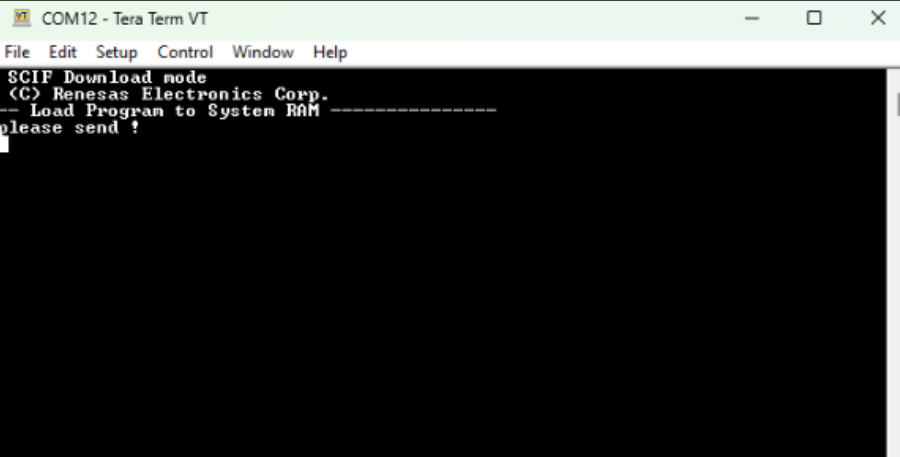 info
infoNOTE When using a Linux development system, perform the following steps before opening the serial console:
-
Identify serial device:

-
Grant permission:

-
Start communication:

-
-
Download Flash Writer to RAM
- Power ON board (SW1).
- Wait until download prompt appears in terminal.
- Send Flash Writer image through serial terminal.
- Use file: DEF_XENO_R2L100_DDR4_2GB_1PCS.mot.
- Tera Term:
File → Send File → Select image → Open
Once the image transfer finishes, the Flash Writer starts automatically and displays the prompt shown below

When using a Linux development PC, open a separate terminal window to transfer the Flash Writer image through the serial interface.
Use the cat command to send the image file to the detected serial device (ttyUSB0).

-
Bootloader Programming (QSPI Flash)
Two bootloader images must be programmed into the QSPI flash to enable system boot on the XENO_R2L100 board.A. Increase Serial Transfer Speed

The Flash Writer switches to high-speed communication.
Change the terminal baud rate from 115200 bps to 921600 bps, then press Enter to continueB. Program Boot Loader Stage 2 (BL2)

Enter the following values when prompted:
Parameter Value Program Load Address 11E00 QSPI Save Address 00000 When the terminal displays “please send!”, transfer the file

If confirmation is requested, enter:

C. Program Firmware Image Package (FIP)
Run the command again:Parameter Value Program Load Address 00000 QSPI Save Address 1D200 
If confirmation is requested, enter
D. Restore Default Speed
After both images are written:- Change terminal speed back to 115200 bps
- Power OFF the board using SW1
Bootloader Programming Summary:
File Name RAM Load Address QSPI Address XENO_R2L100_bl2_bp.srec 0x11E00 0x00000 XENO_R2L100_fip.srec 0x00000 0x1D200 -
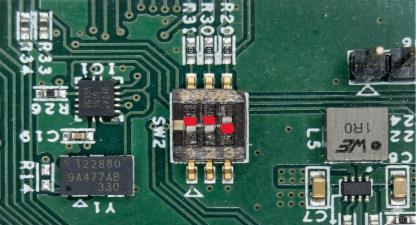
Change Back to Normal Boot Mode set the SW2 boot switch to the SPI (QSPI) boot configuration as shown in the figure below.
Power ON the board using SW1, then press the RESET button (S1). After reset, verify that boot messages similar to the following are displayed on the serial terminal:
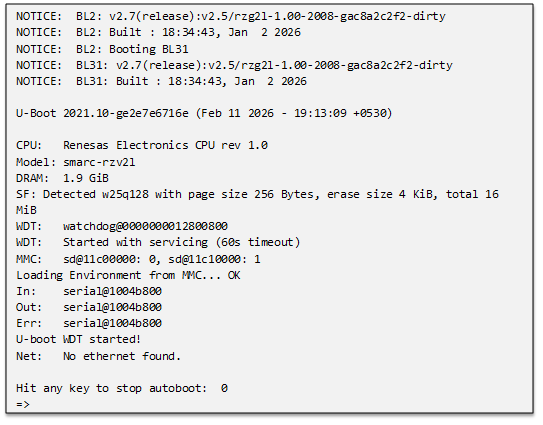
The appearance of the U-Boot prompt (=>) confirms that the bootloader has been programmed correctly and the system is booting from QSPI flash.
Procedure to Flash the Linux System Image
The Linux system image on the XENO-R2L100 platform can be loaded using a USB storage device. Once the system boots successfully, the kernel, device tree, and root filesystem may be copied to the onboard eMMC storage for permanent operation.
Boot Linux from USB Device
This section describes the procedure to boot the XENO_R2L100 platform using a USB flash drive. The USB device must contain the Linux kernel, device tree, and root filesystem prepared as described below
-
Prepare USB Boot Device
This section explains how to prepare a USB flash drive for booting the XENO_R2L100 platform. The USB device requires two partitions:FAT32 → Kernel and Device Tree files
EXT4 → Root filesystem1.1 Download Required Images
A. Download the latest Kernel, Device Tree, and Root Filesystem packages from the Eoxys download portal.
B. Extract the files into a working directory on the development PC.Example:

| File Name | Description |
|---|---|
| Image-XENO_R2L100.bin | Linux kernel image |
| r9a07g054l2-XENO_R2L100.dtb | Device tree file |
| core-image-weston-smarc-XENO_R2L100.bz2 | Root filesystem |
1.2 Create USB Partitions Using Linux PC
-
Insert the USB drive and identify the device

Assume the USB device is /dev/sdb. -
Unmount Existing Partitions

-
Create New Partition Table

Inside fdisk, enter:
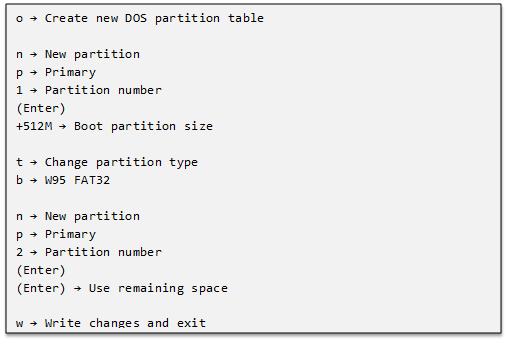
Update partition table:

Verify:
Expected layout:

-
Format Partitions
Format FAT32 Boot Partition

Format RootFS Partition

-
Copy Boot Files (FAT32 Partition)

Verify:
![]()
Unmount:
![]()
- Extract Root Filesystem (EXT4 Partition)
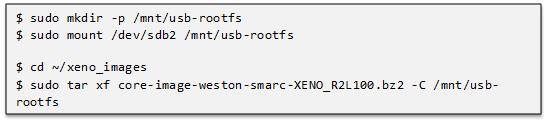
Verify:
![]()
Expected folders:
![]()
- Finalize USB Drive

USB drive preparation is complete.
The device is now ready for USB boot configuration.
-
Configure U-Boot to Boot from USB
After preparing the USB drive, insert the USB pendrive into the board USB Host port and configure the U-Boot environment to boot the system from the USB device.
When the system powers on, stop the autoboot process at the following prompt:
Then execute the following commands:
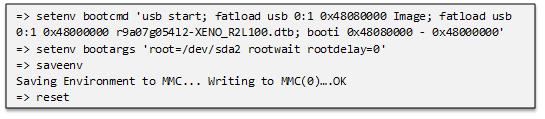
Boot Verification:
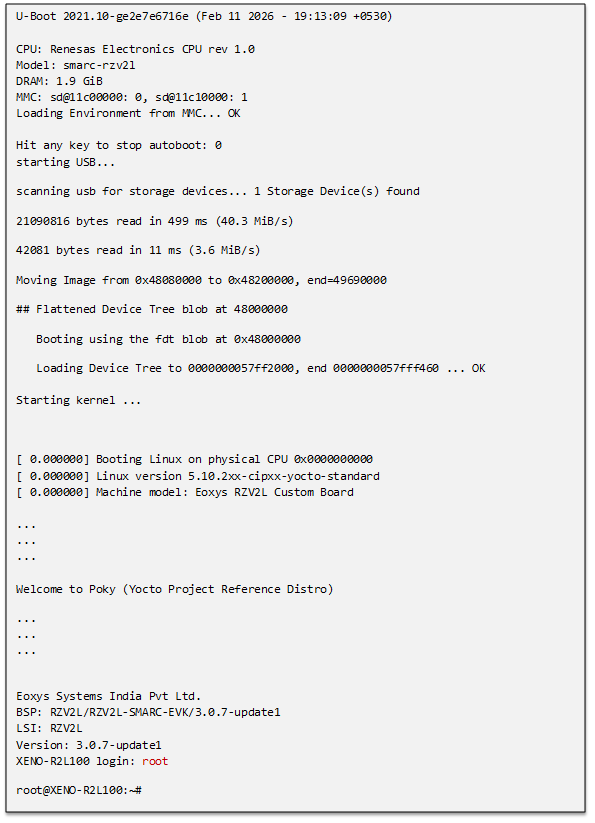
After executing the reset command, the board reboots and starts booting from the USB device.The serial terminal displays messages similar to the following:
Boot Log (Reference Output)
Install Linux System to Emmc
This section describes how to install the Linux system image to the onboard eMMC storage of the XENO-R2L100 platform.
The system must first be booted using the USB boot method described in Section 12.2.1. After logging into Linux, the kernel, device tree, and root filesystem can be copied to the eMMC storage for standalone operation.
- Boot the System Using USB
Insert the prepared USB storage device and boot the system as described in Section 12.2.1.
After the boot process completes, the Linux login prompt appears:
![]()
Login as root.
- Identify the eMMC Device
Check the available storage devices:
![]()
Typical output:

- Create eMMC Partitions
Use fdisk to create partitions on the eMMC device.
![]()
Inside fdisk, create two partitions:

Example layout:

- Format eMMC Partitions
Format the boot partition:
![]()
Format the root filesystem partition:
![]()
- Copy Boot Files to eMMC
Mount the boot partition:

Copy kernel and device tree files from USB:

Unmount the partition:
![]()
- Copy Root Filesystem
Mount the eMMC root partition:

Copy the filesystem from the USB root partition:
![]()
Unmount the partition:
![]()
- Configure U-Boot to Boot from eMMC
Reboot the board and stop at the U-Boot prompt.
Set the boot parameters:

Boot Verification:
After reboot, the system loads the kernel and root filesystem from eMMC storage.
The login prompt appears on the serial console:
![]()
The board is now configured to boot Linux directly from the onboard eMMC.